
How to set up a workflow
General Introduction
We describe here how to set up an outbound workflow, intended for materials and/or data that are being sent from your institution to another institution. In this case, TTConnect generates a draft transfer agreement based on information gathered from several sources. Inbound workflows are set up in a similar manner, except they do not need a template agreement.Step-by-step instructions
Note: This can be done by the Institutional Account Holder.
-
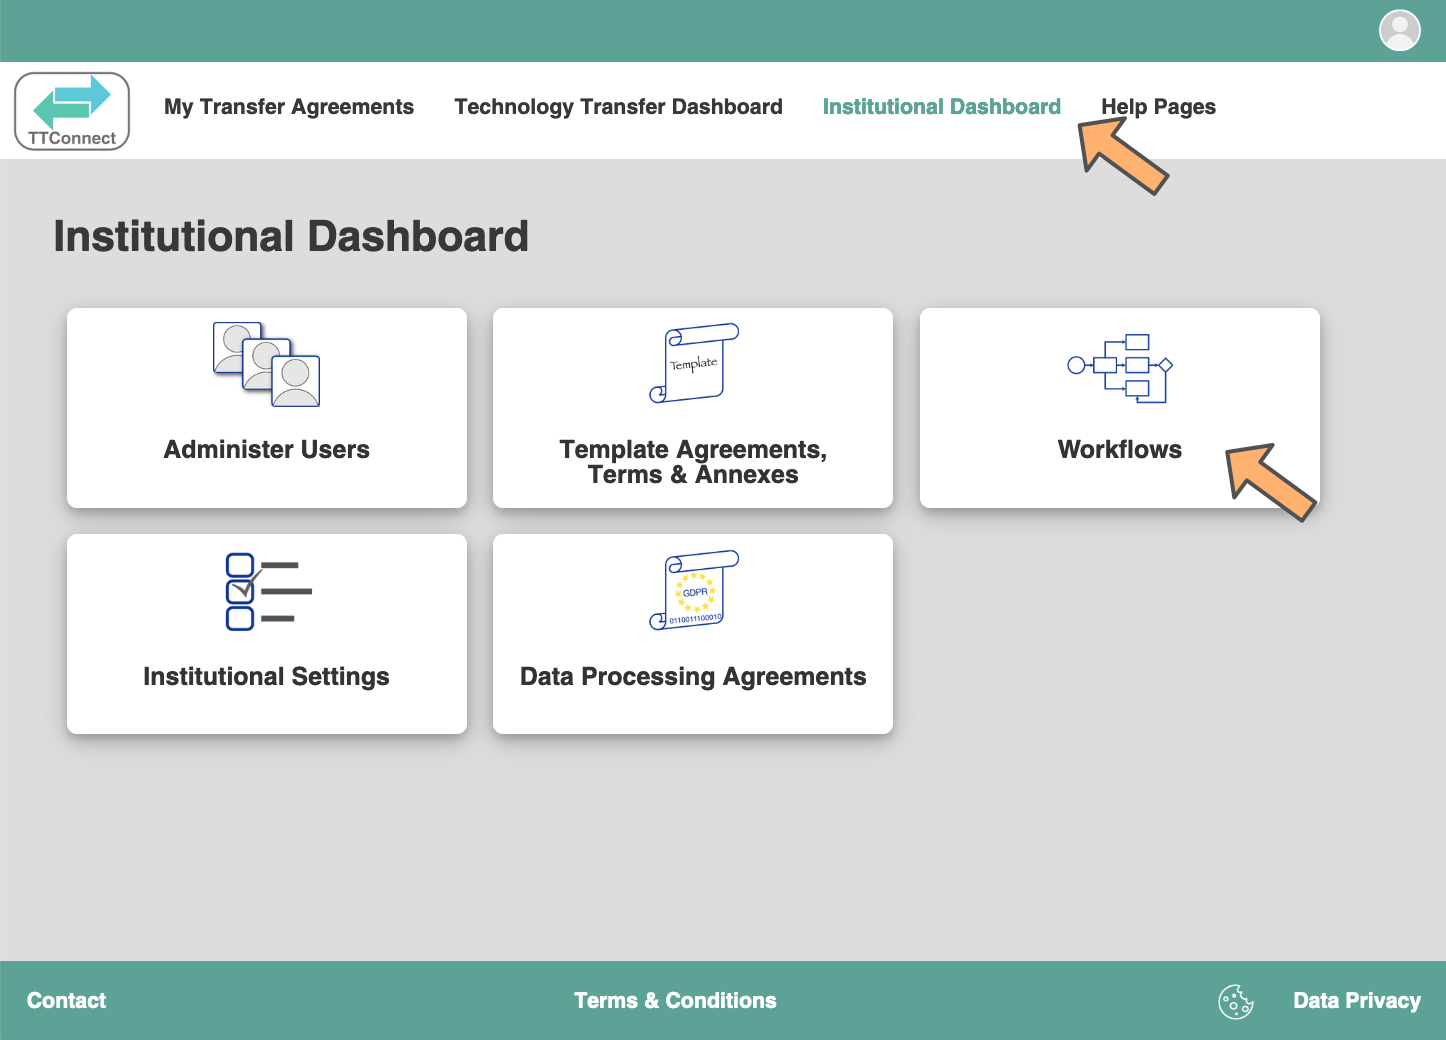
Click on "Institution Dashboard" in the menu bar at the top, then on "Workflows".
-
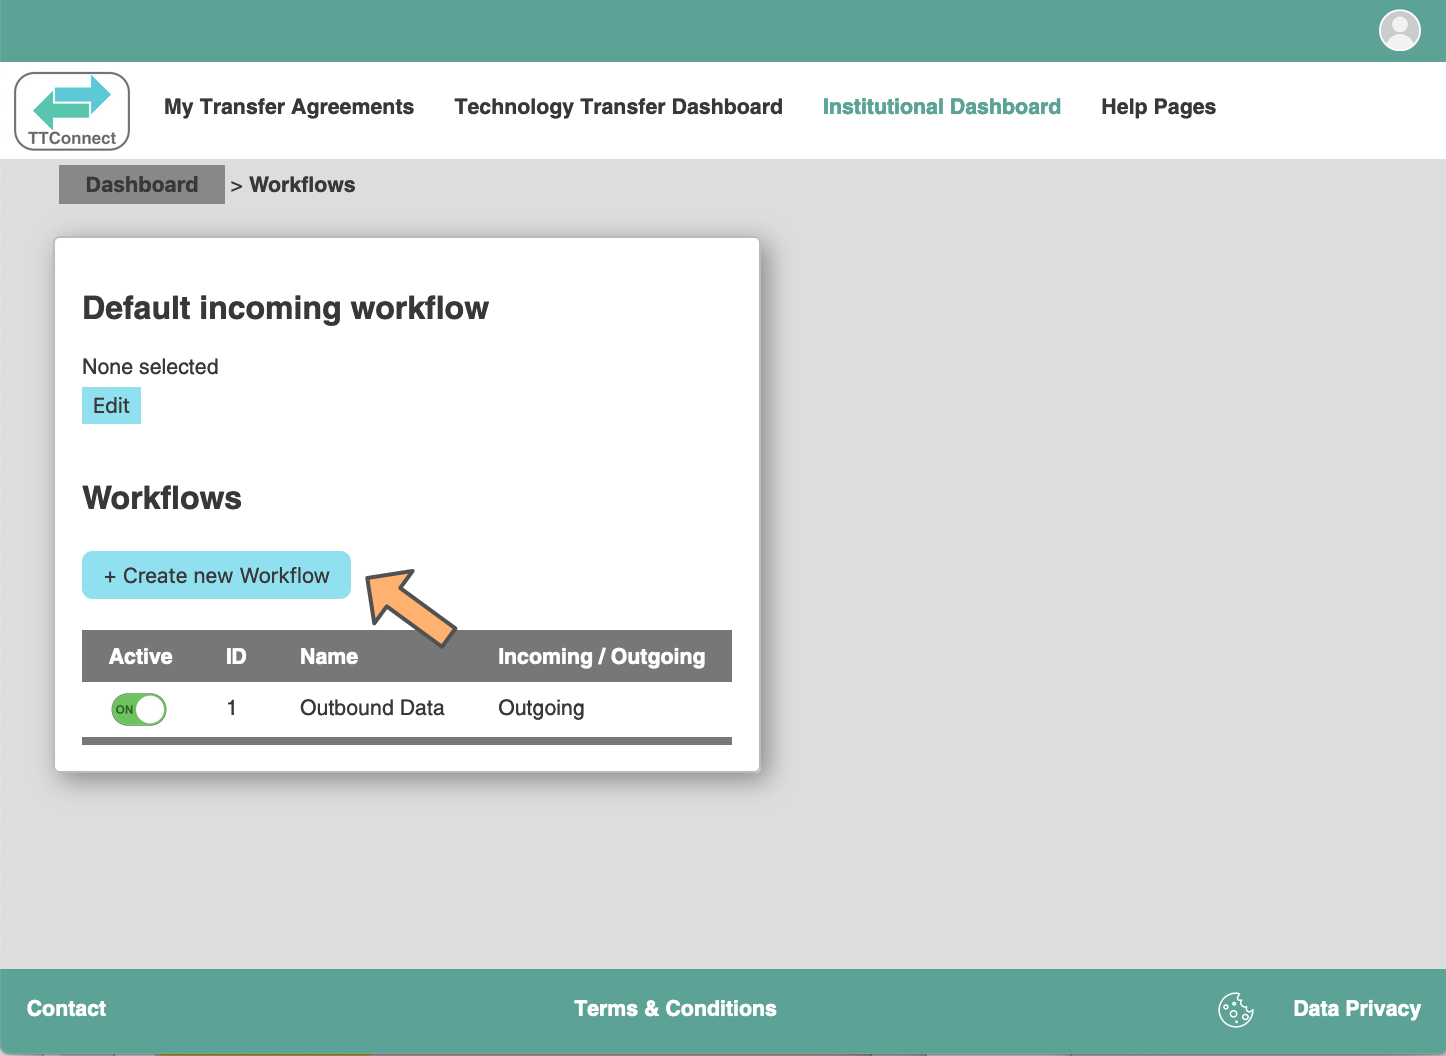
Click "Create new Workflow".
-
Give your new workflow a name and a description, select "Outgoing", and then click on "Submit".
The name and the description will be visible to the other users from your institution when they want to
create a new material or data transfer and need to select a workflow. So make sure the description explains
in which situations this workflow should, or should not, be selected. For instance, if the template agreement
of this workflow is only appropriate for material transfers, but not data transfers, then specify this in
the description.
Selecting "Outgoing" specifies that this workflow will require a template agreement, and that TTConnect will use it to generate a draft agreement. If this is not needed, select "Incoming" instead.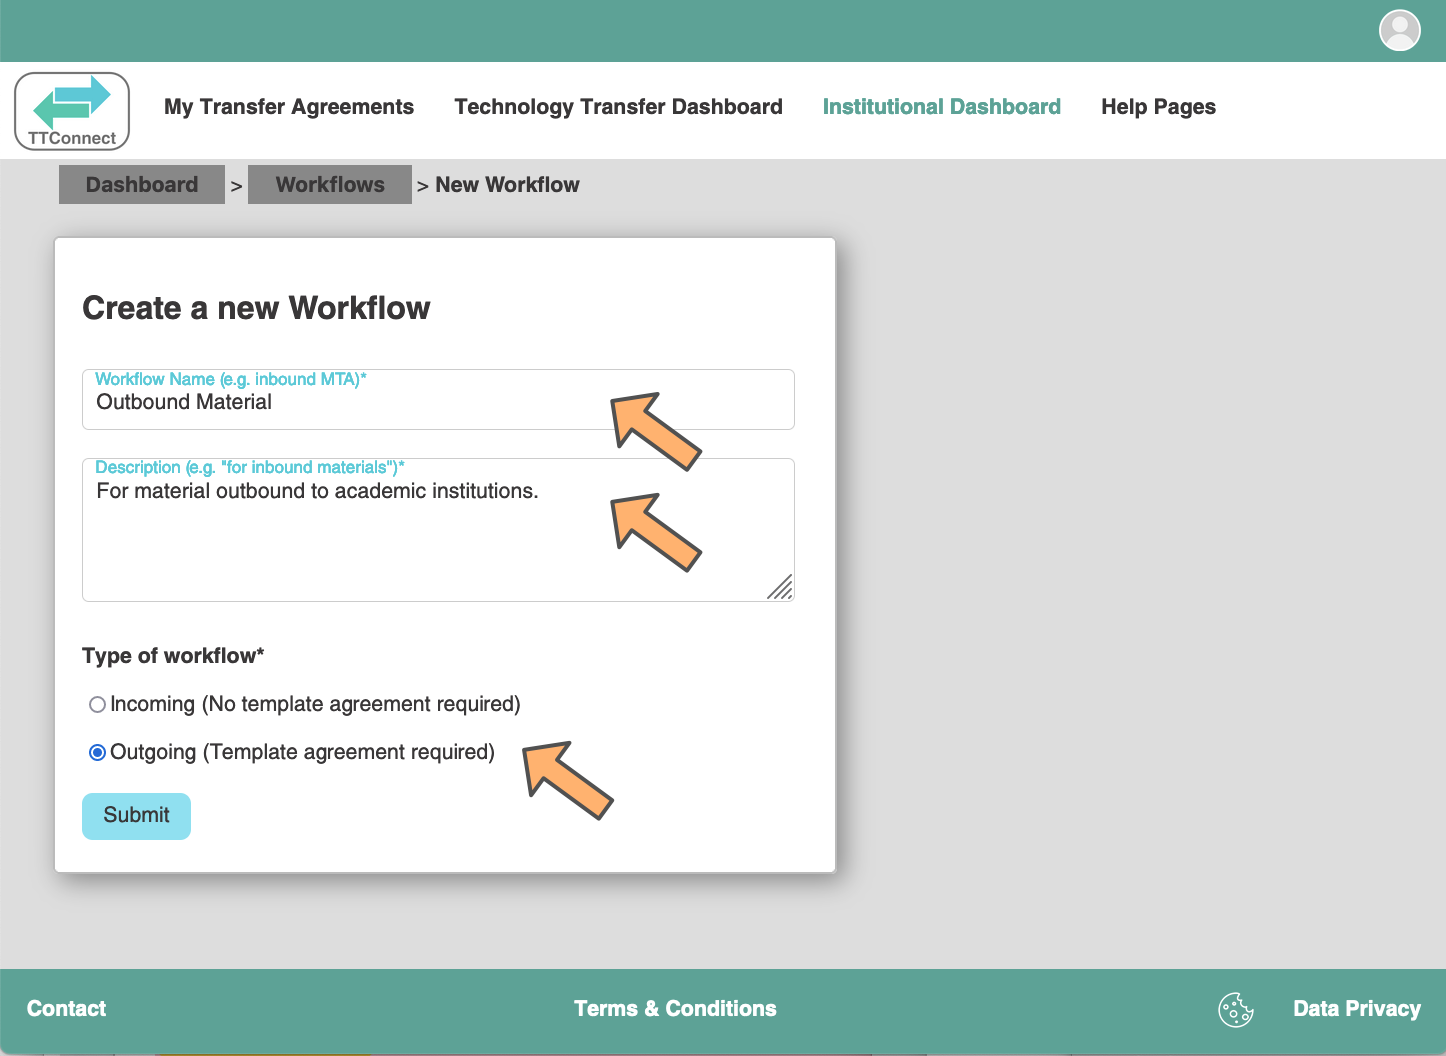
-
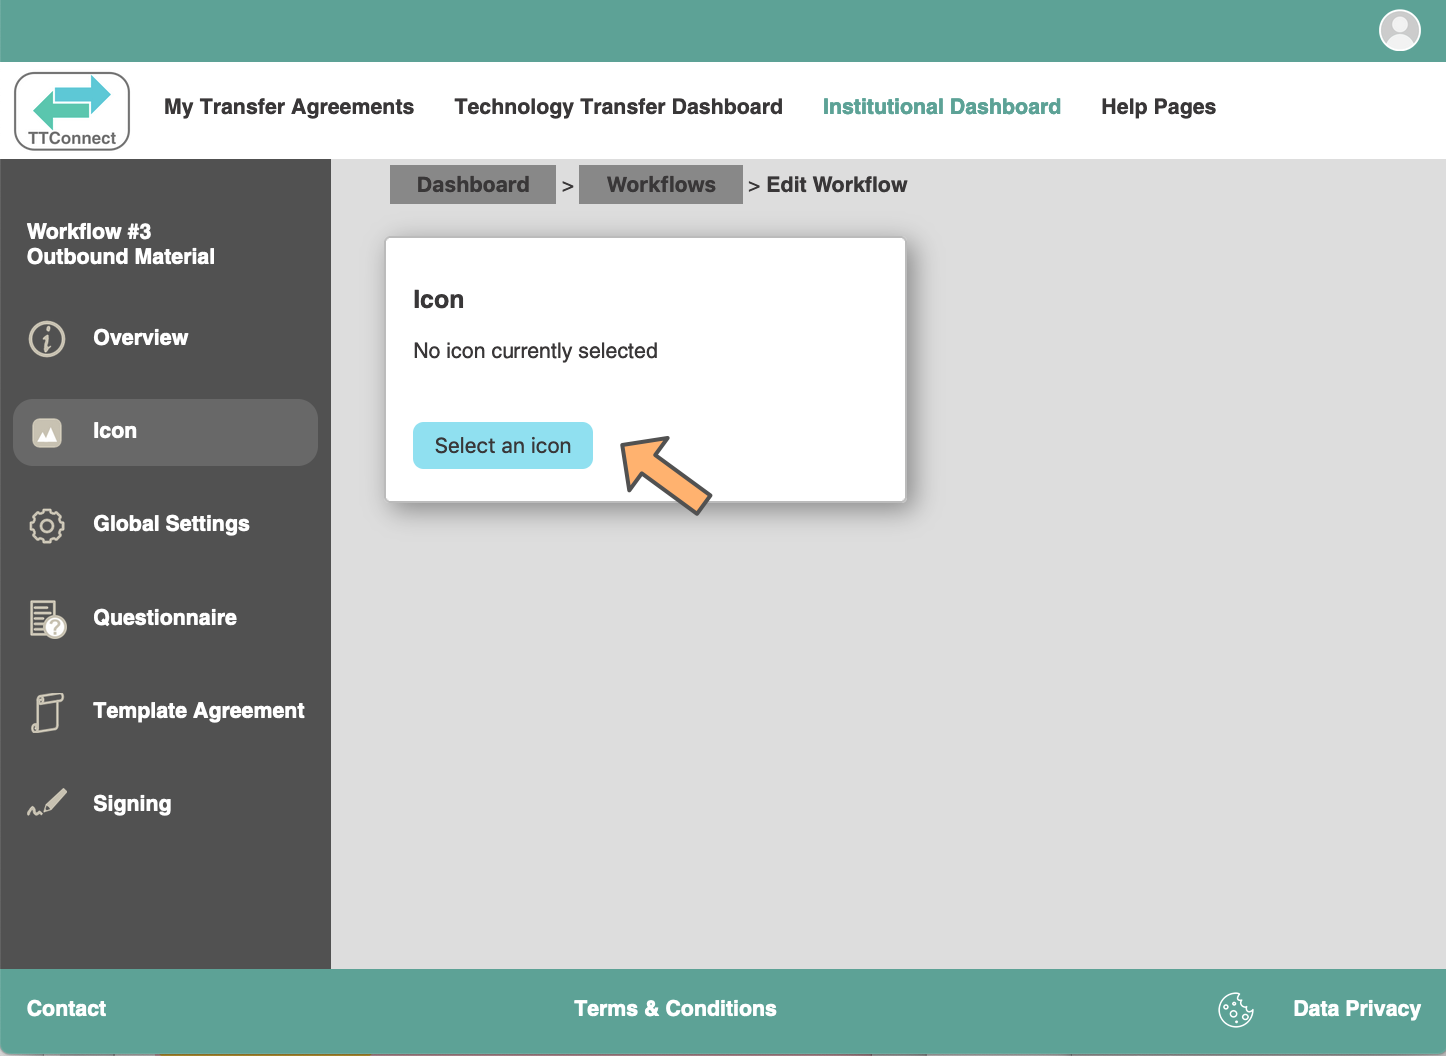
You can now edit your workflow. If you wish, click on "Icon" on the left and select an icon that will be shown next to
this workflow when scientists from your institution wish to create a new material or data transfer.
-
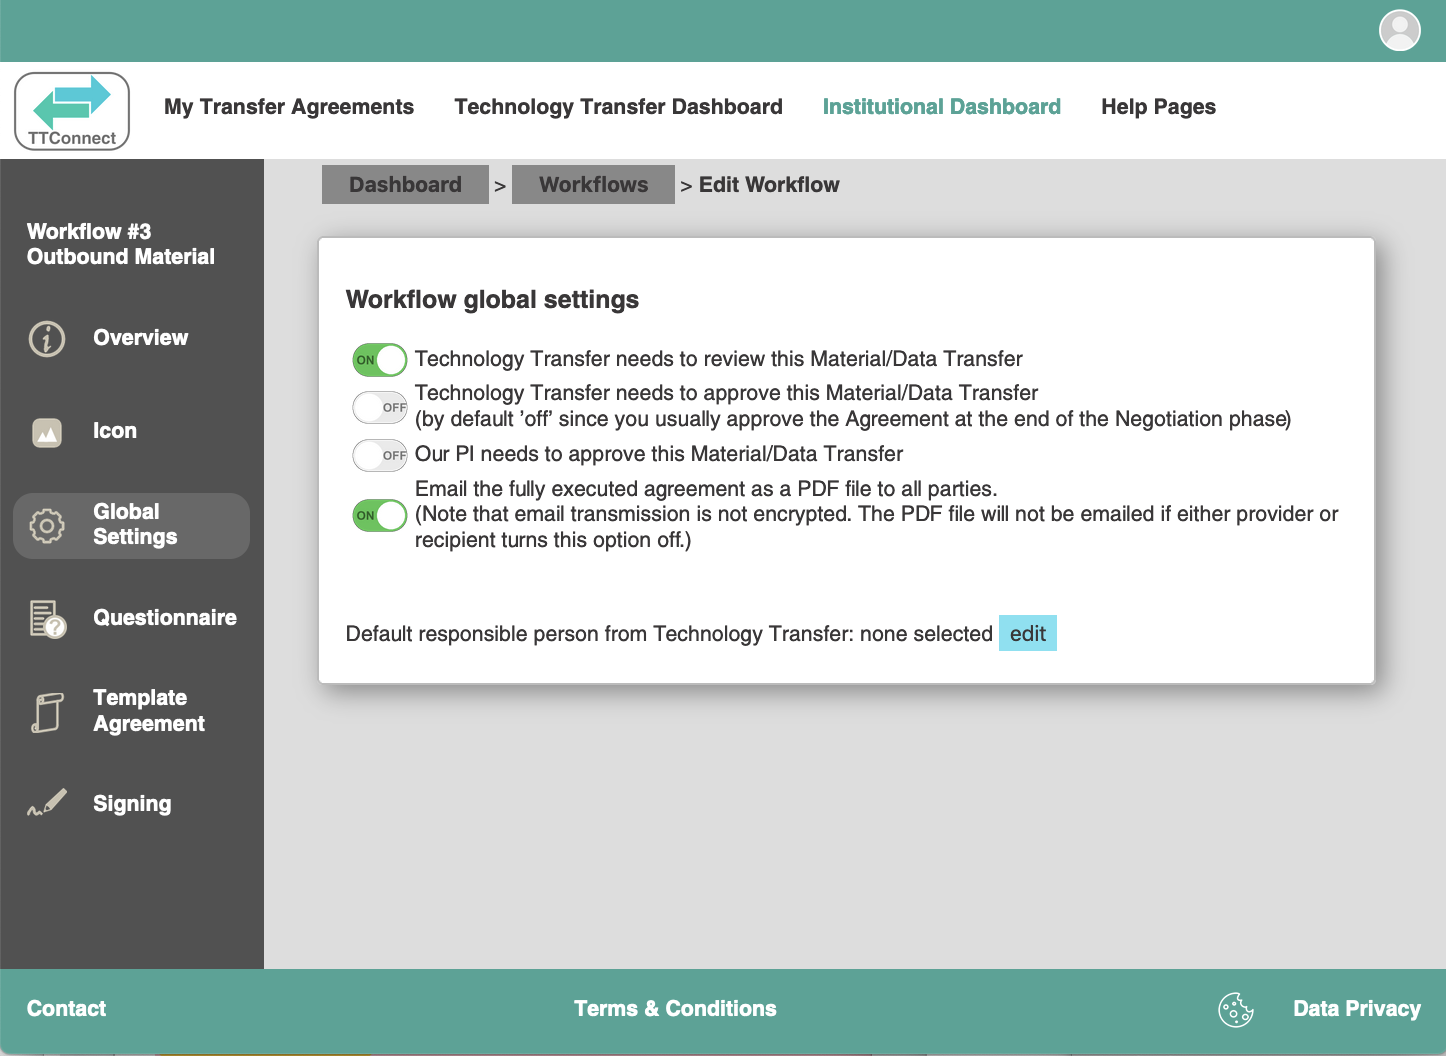
The "Global Settings" tab on the left allows you to select various options:
- "Technology Transfer needs to review this Material/Data transfer": By default, this is on. If you turn it off, the transfer agreement generated by TTConnect, based on information entered by the provider scientist from your institution, will be sent directly to the recipient for signing. Your Technology Transfer office will not be notified, and will not need to review the transfer agreement, and the negotiation phase will be completely skipped. In this case, the transfer agreement will be shown to the recipient as a "non-negotiable" agreement. This fully automates the process so that you do not need to handle the agreement at all. This is appropriate for 'simple' transfer agreements.
- "Technology Transfer needs to approve this Material/Data transfer". By default, this is off. Approvals take place after negotiation of the agreement. Since negotiation is done by the Technology Transfer office, there is usually no need for Technology Transfer to first negotiate and then also approve the agreement. However, in cases where Technology Transfer does not negotiate the agreement (e.g. the toggle "Technology Transfer needs to review this Material/Data transfer" is turned off) this can be turned on.
- "Our PI needs to approve this Material/Data transfer". By default, this is off. Approvals take place after negotiations had led to a finalized version of the agreement. If you wish the PI to see and approve the final version of the agreement prior to signing, turn this toggle on. This will then be the default for all transfer agreements generated using this workflow. This option can also be turned on or off individually for every single transfer agreement later by the Technology Transfer person handling the agreement.
- "Email the fully executed agreement as a PDF file to all parties". By default, this is on. Once the agreement is signed, it will be emailed to all parties as a PDF file attached to an email. This includes the provider scientist, the recipient scientist, the Technology Transfer representatives of both institutions, and anyone who signed the agreement. However, email is not encrypted and can be hacked by 3rd parties during transmission. Hence, for agreements containing confidential information, this function can be turned off. In this case, the relevant parties will receive an email informing them that the agreement is fully executed, but they will need to login to TTConnect to download the agreement. This is less convenient, and if some people who signed the agreement do not have a TTConnect account, they will not be able to download it.
- "Default responsible person from Technology Transfer". The Tech Transfer person responsible for an individual transfer agreement will receive email updates whenever the next step is required. If your institution only has one person in the Technology Transfer function, they will automatically be selected as the responsible person whenever a new transfer agreement is created. If however your Technology Transfer has multiple users, and you would like one of these users to be responsible for transfer agreements generated using this workflow, you can select the user here. Allocation of one Technology Transfer representative to a single transfer agreement can also be done later.
-
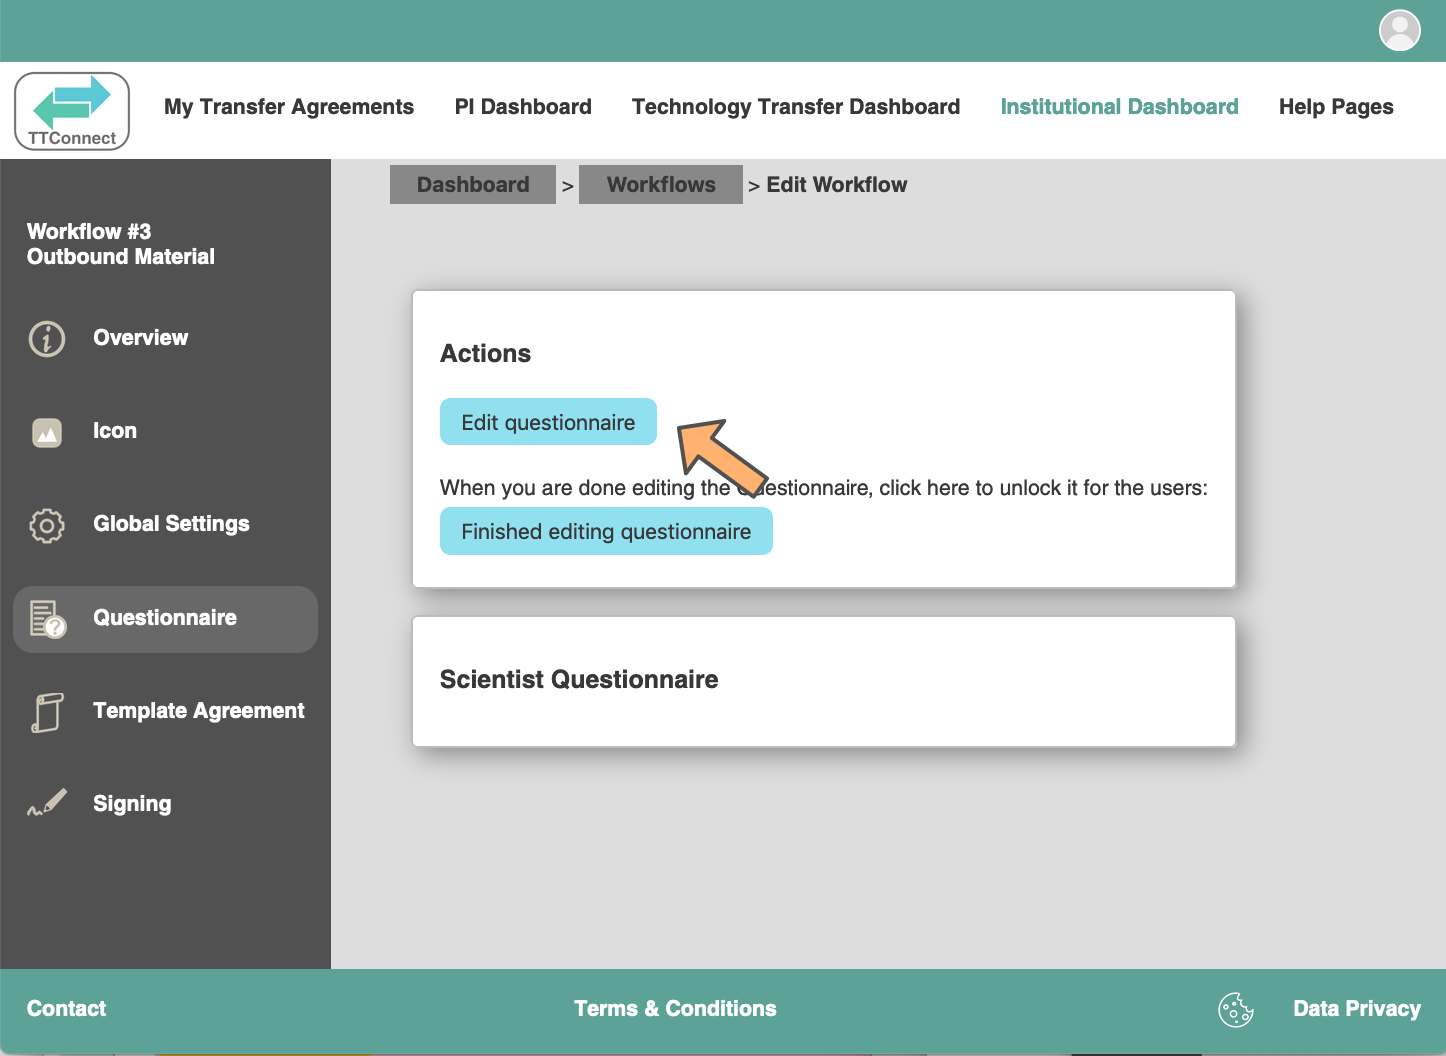
The "Questionnaire" tab allows you to generate a questionnaire which will be shown to scientists from your institution when
they create a new material or data transfer. This enables you to obtain information about the planned material or data transfer
in a systematic fashion, and to influence the steps of the workflow (e.g. who needs to review or approve the agreement, which
additional terms will be added to the agreement, etc.) To do so, click on "Edit questionnaire".
-
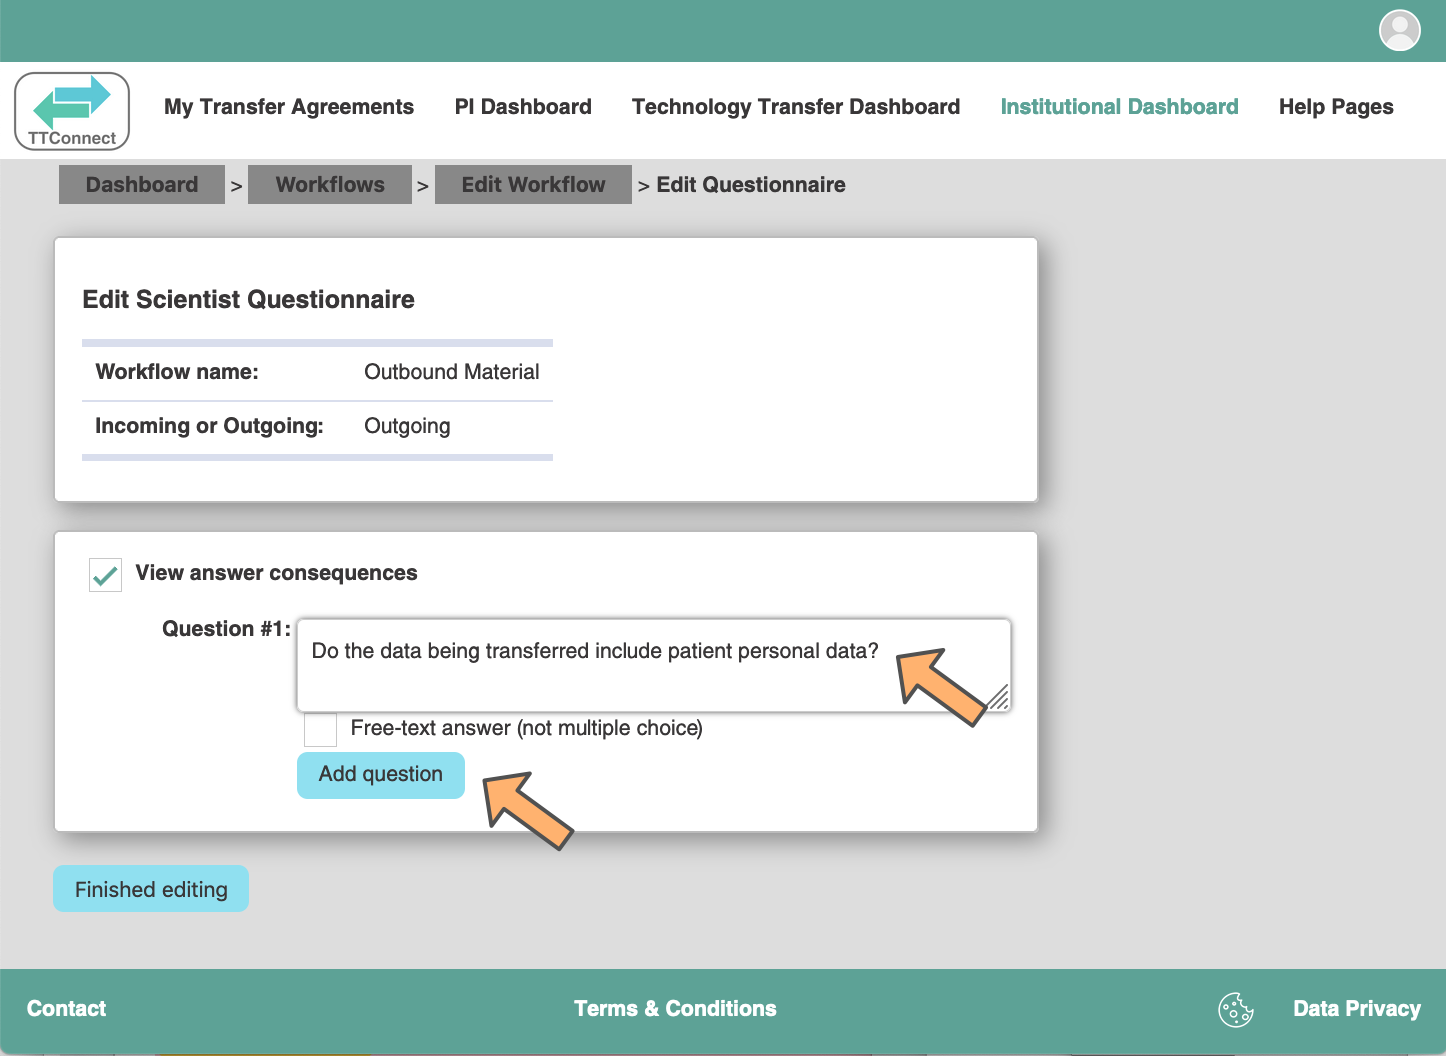
The Questionnaire consists of a series of questions that can be either multiple-choice or free-text. Enter the text of the first question
and then click "Add question". If the question is not a multiple-choice question,
then click the "Free-text" checkbox. Note that only multiple-choice questions can influence
the workflow, and can be used for automated events, therefore the questionnaire should consist mainly of mutiple-choice
questions.
-
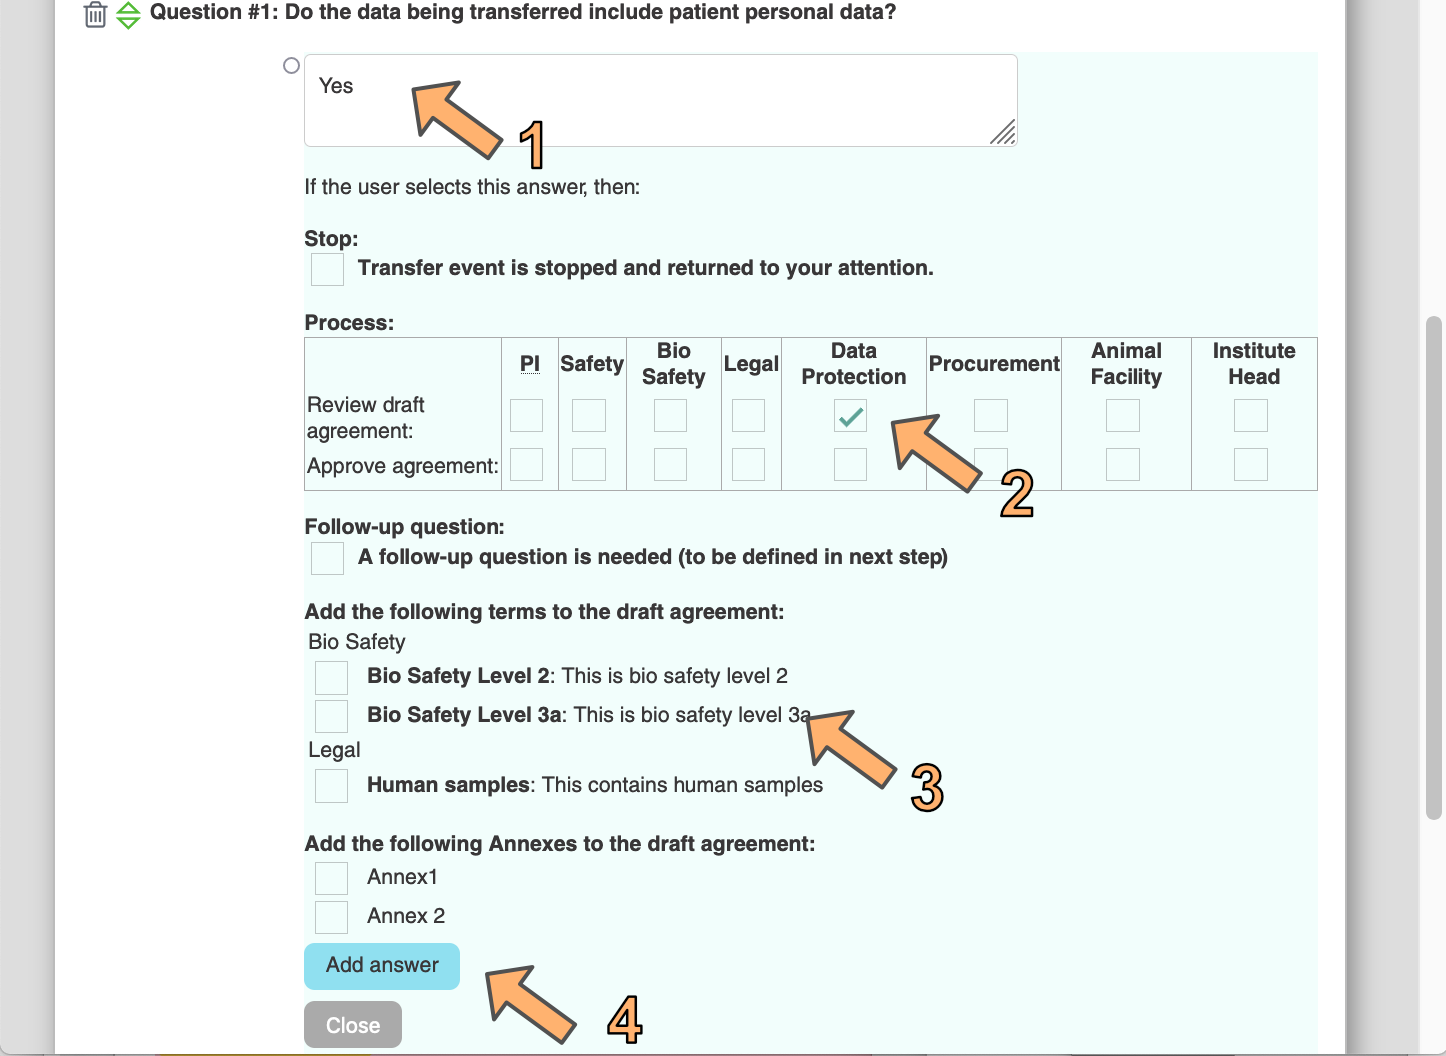
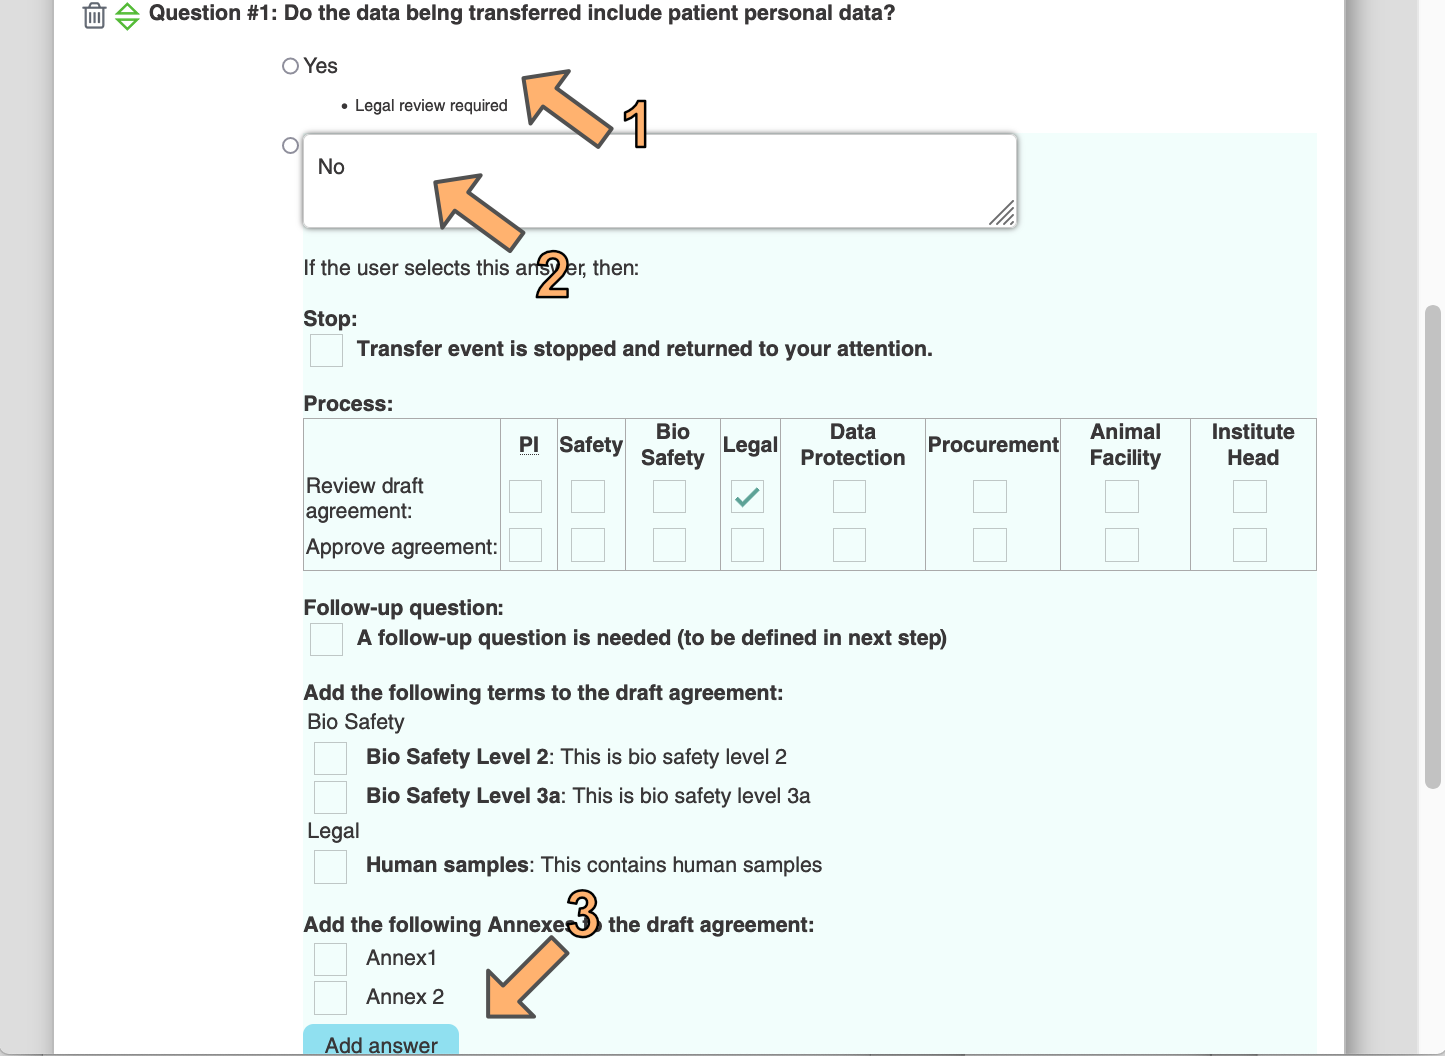
Next, add answers to the multiple-choice question. (1) Enter the text of the answer. In the case shown below, it's "Yes".
If you click the checkbox "Transfer event is stopped and returned to your attention" then if the provider scientist selects this answer when filling out the questionnaire, the entire workflow will stop and you will be informed.
(2) In this section you can select the workflow consequences if the scientist selects this answer. It can cause the draft agreement to be reviewed by a special function, or, after the agreement is finalized, to be approved by a special function. For instance, in the case shown here, the question is "Do the data being transferred include patient personal data?". This answer "yes" would cause the Data Protection office to review the agreement.
If you tick the "follow-up question" box, a follow-up question will appear if the scientist selects this answer. Only one level of follow-up questions is possible. For instance, in this case, the follow-up question could be "Are the data anonymized"?
(3) The next section consists of additional terms that can be added to the agreement if the scientist selects this answer. These "add-on terms" need to first be created in the TTConnect system. For instance, in this case, some additional terms requiring the recipient to safeguard the personal data could be added to the agreement.
Likewise, in the following section, additional annexes can be added to the agreement if the scientist selects this answer.
(4) Finally, click "Add answer" to save this answer.
-
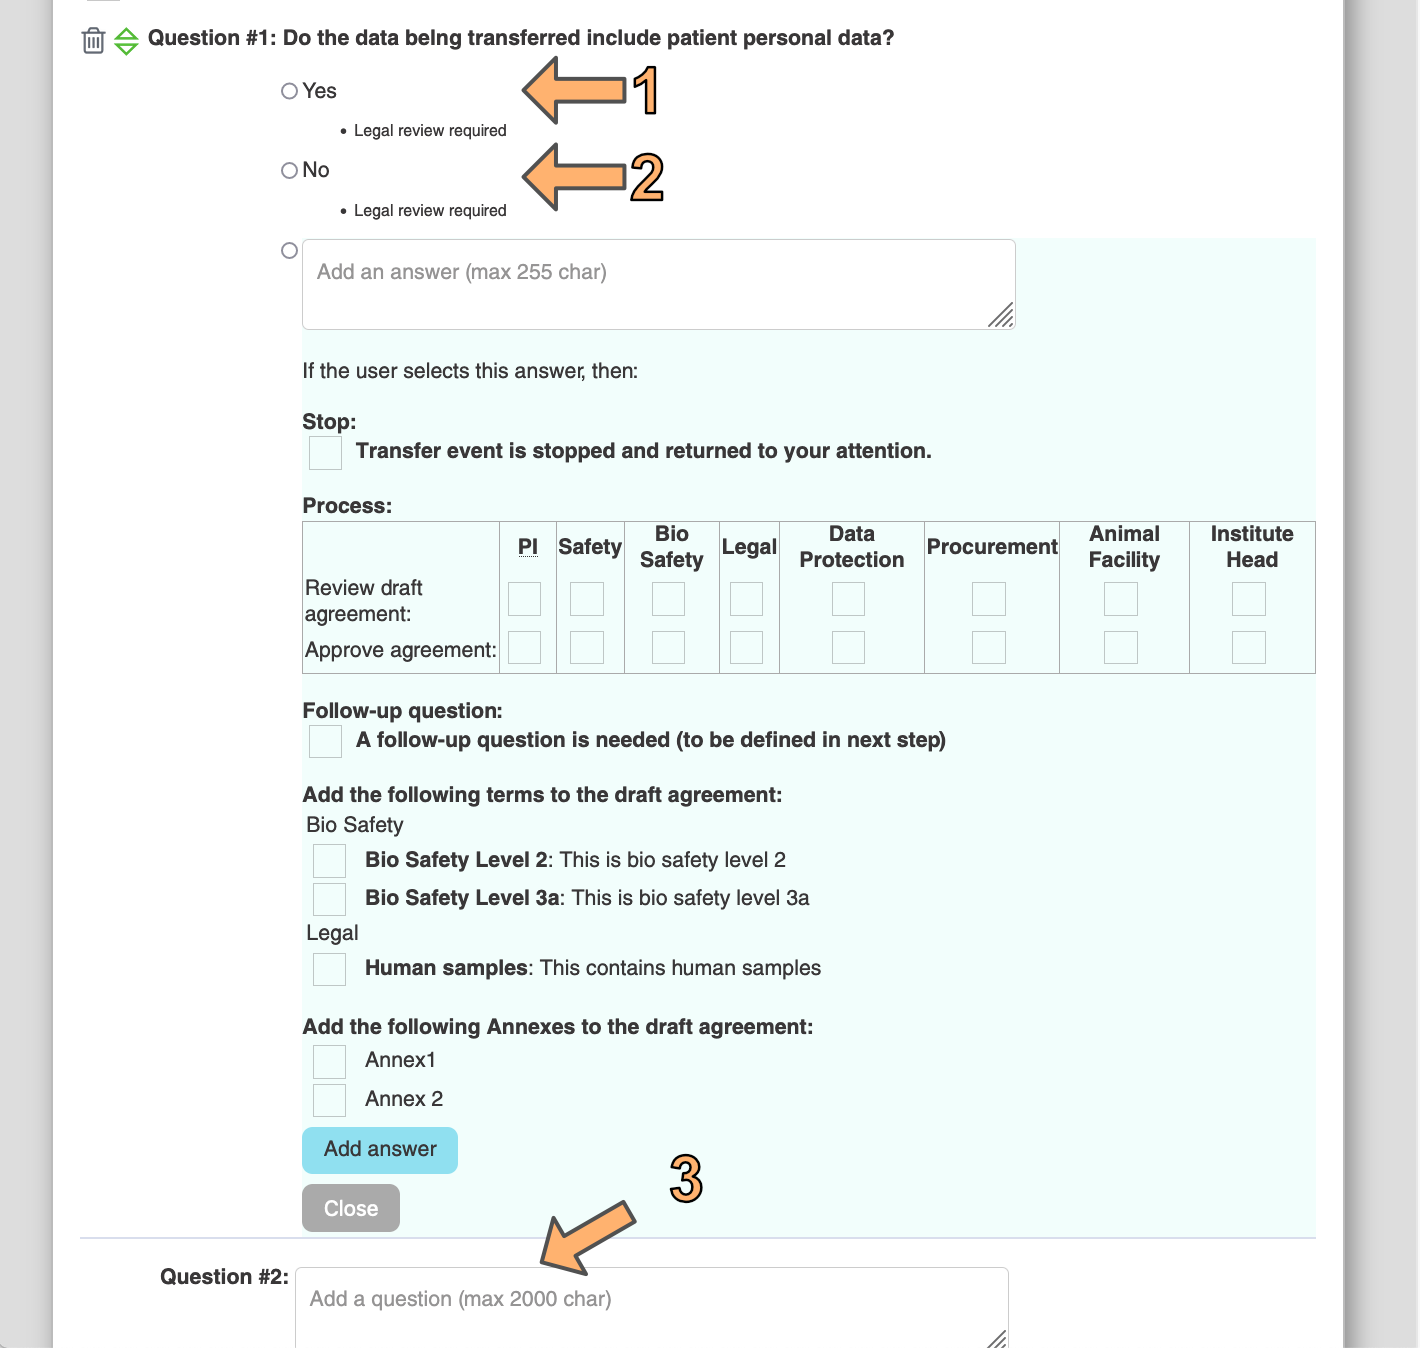
This answer is now saved (1) and you can add a second answer, in this case "No" (2). Since "No" would entail no consequences
for the workflow or the transfer agreement, you can then click "Add answer" (3).
-
Now both answers are saved (1 and 2) and you can either click "Close", or directly start writing the 2nd question (3).
-
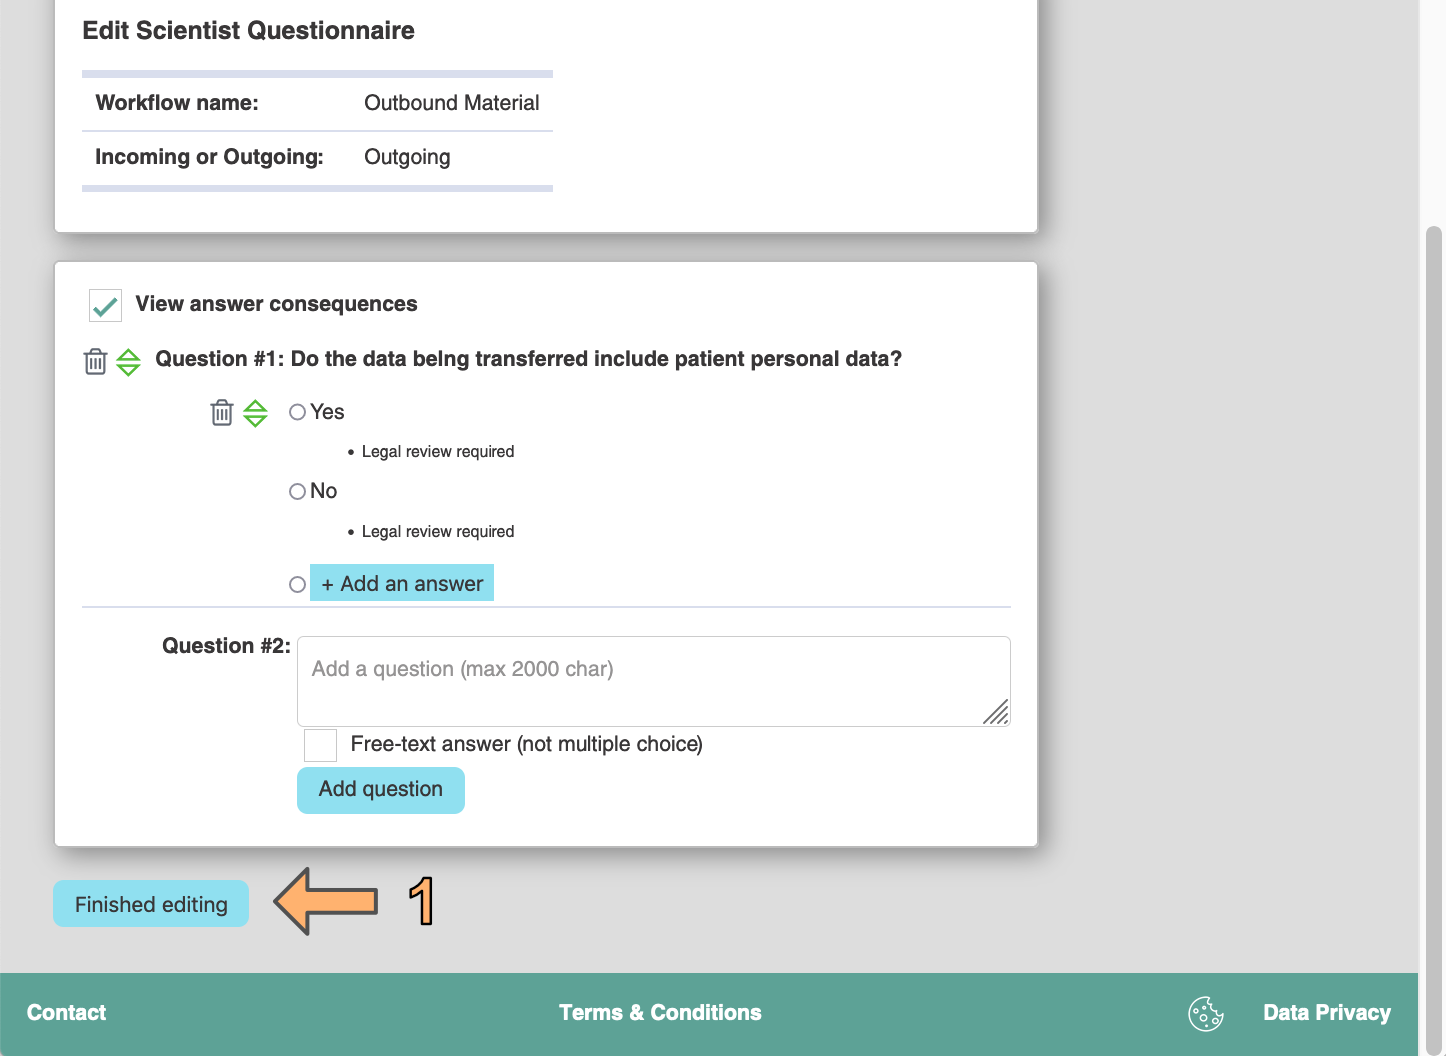
The questionnaire can contain as many questions as you wish, with as many answers as you wish. The order of the questions and
of the answers can be changed by clicking on the green up and down arrows that appear when you hover over a question or answer.
-
When you are done editing the questionnaire, click on "Finished editing".
-
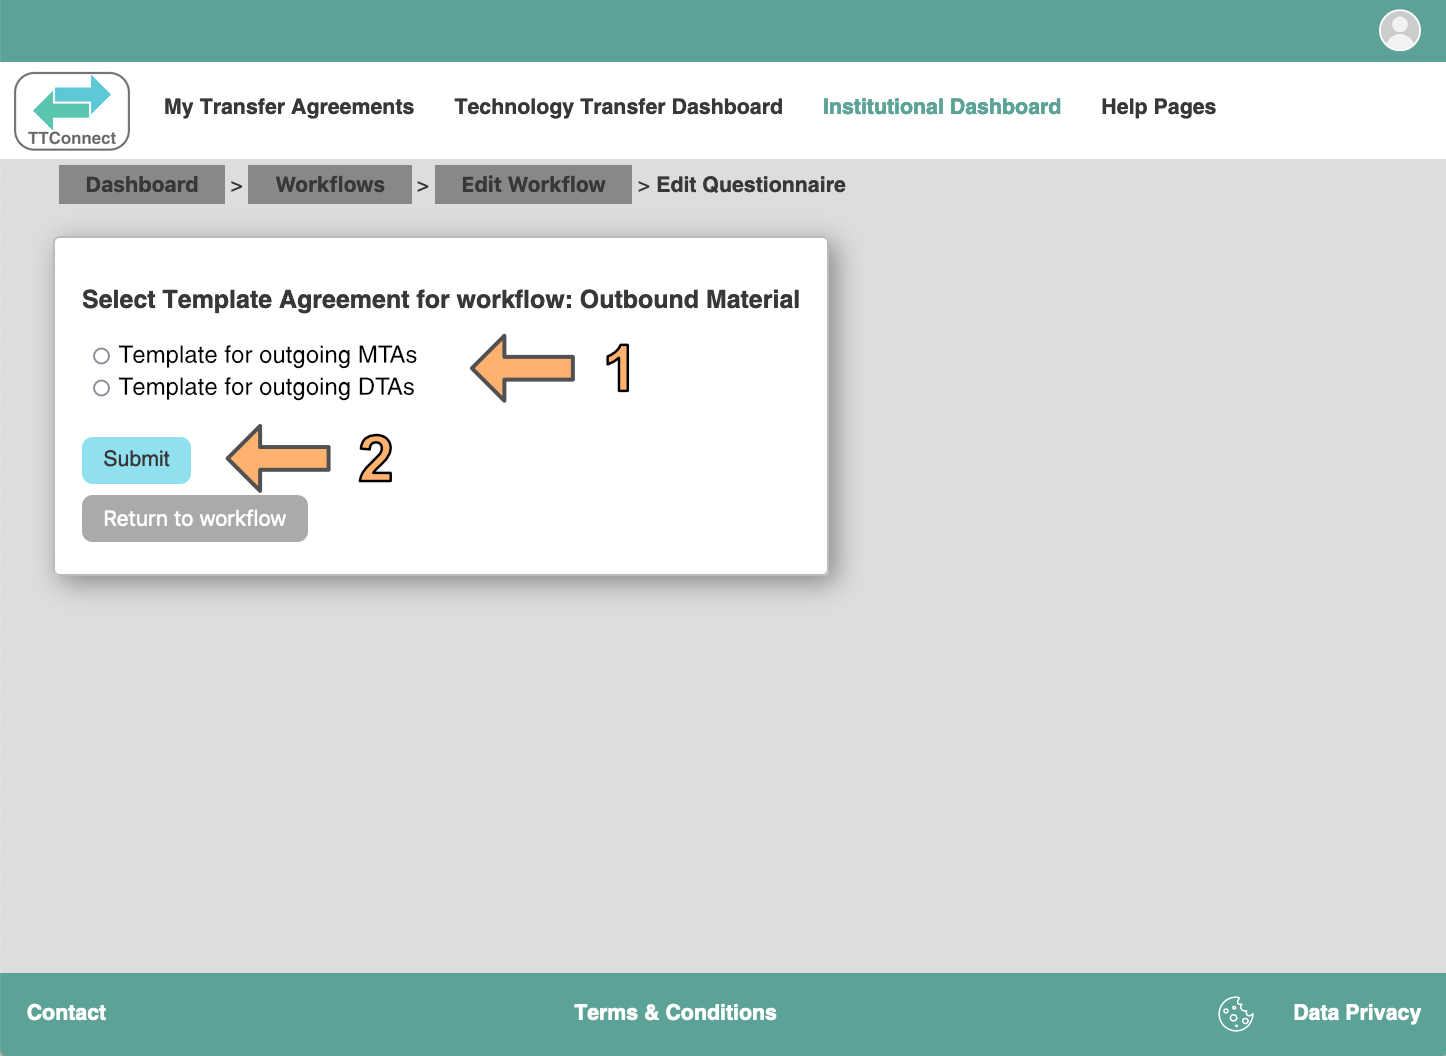
Two steps are left to finish your new workflow. Firstly, select the template agreement that you want to be used for transfers
with this workflow. (Template agreements need to first be added to TTConnect as described
here.)
Click on "Template Agreement" in the menu bar on the left, then "Assign template agreement".Then select the appropriate template agreement (1). This will depend on the names you gave the template agreements that you uploaded to TTConnect. Then click "submit" (2).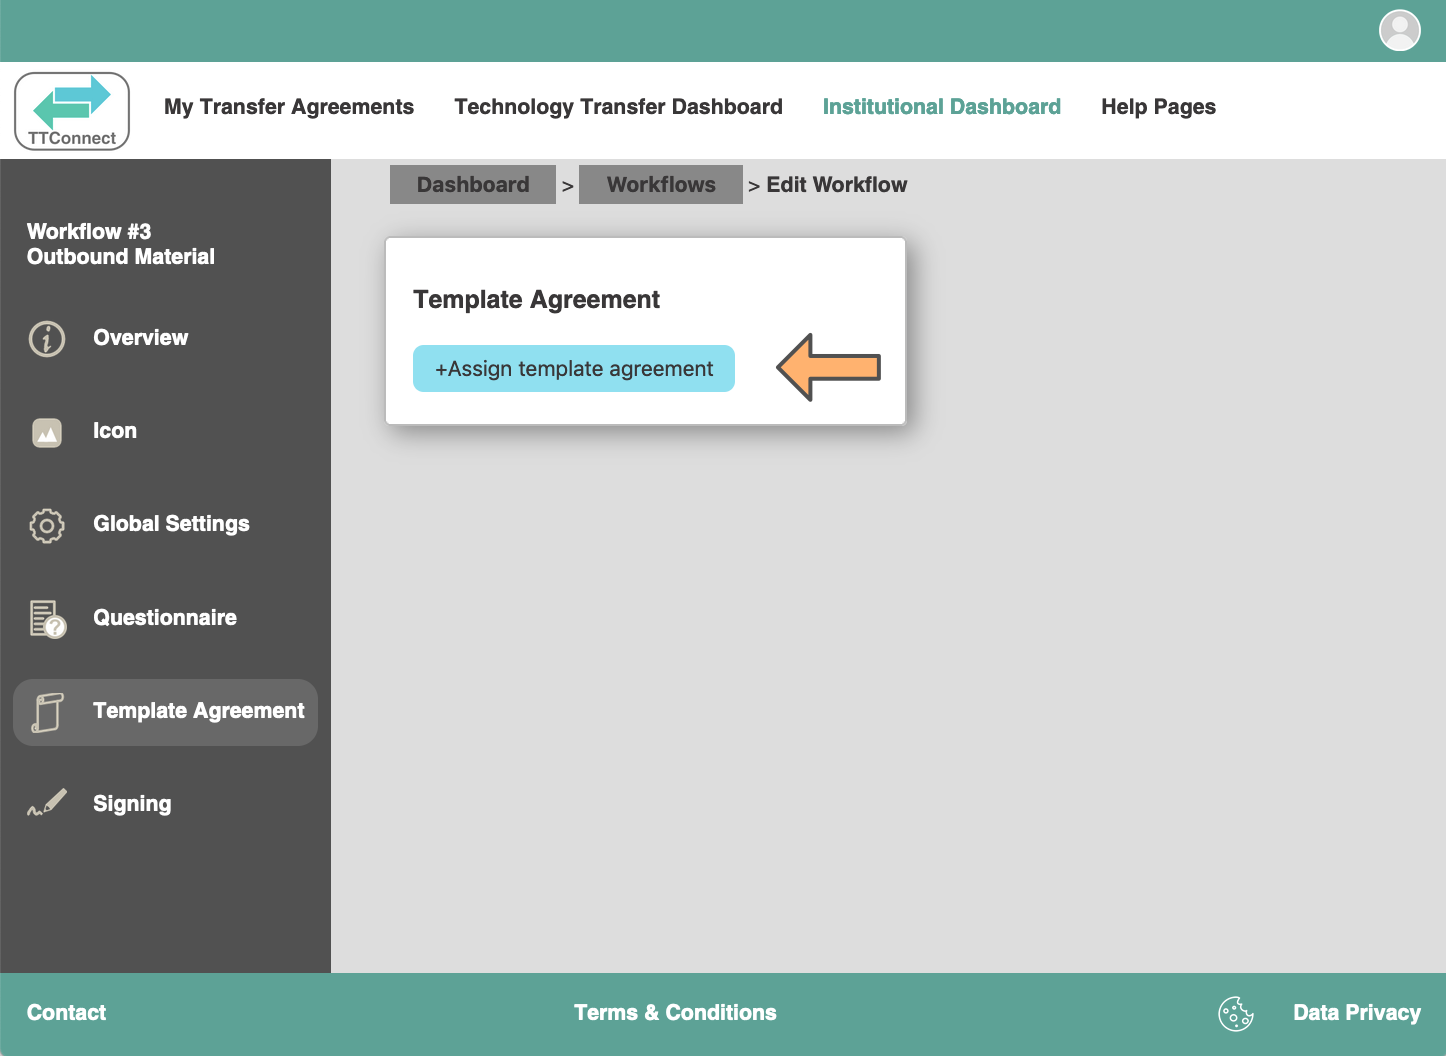
-
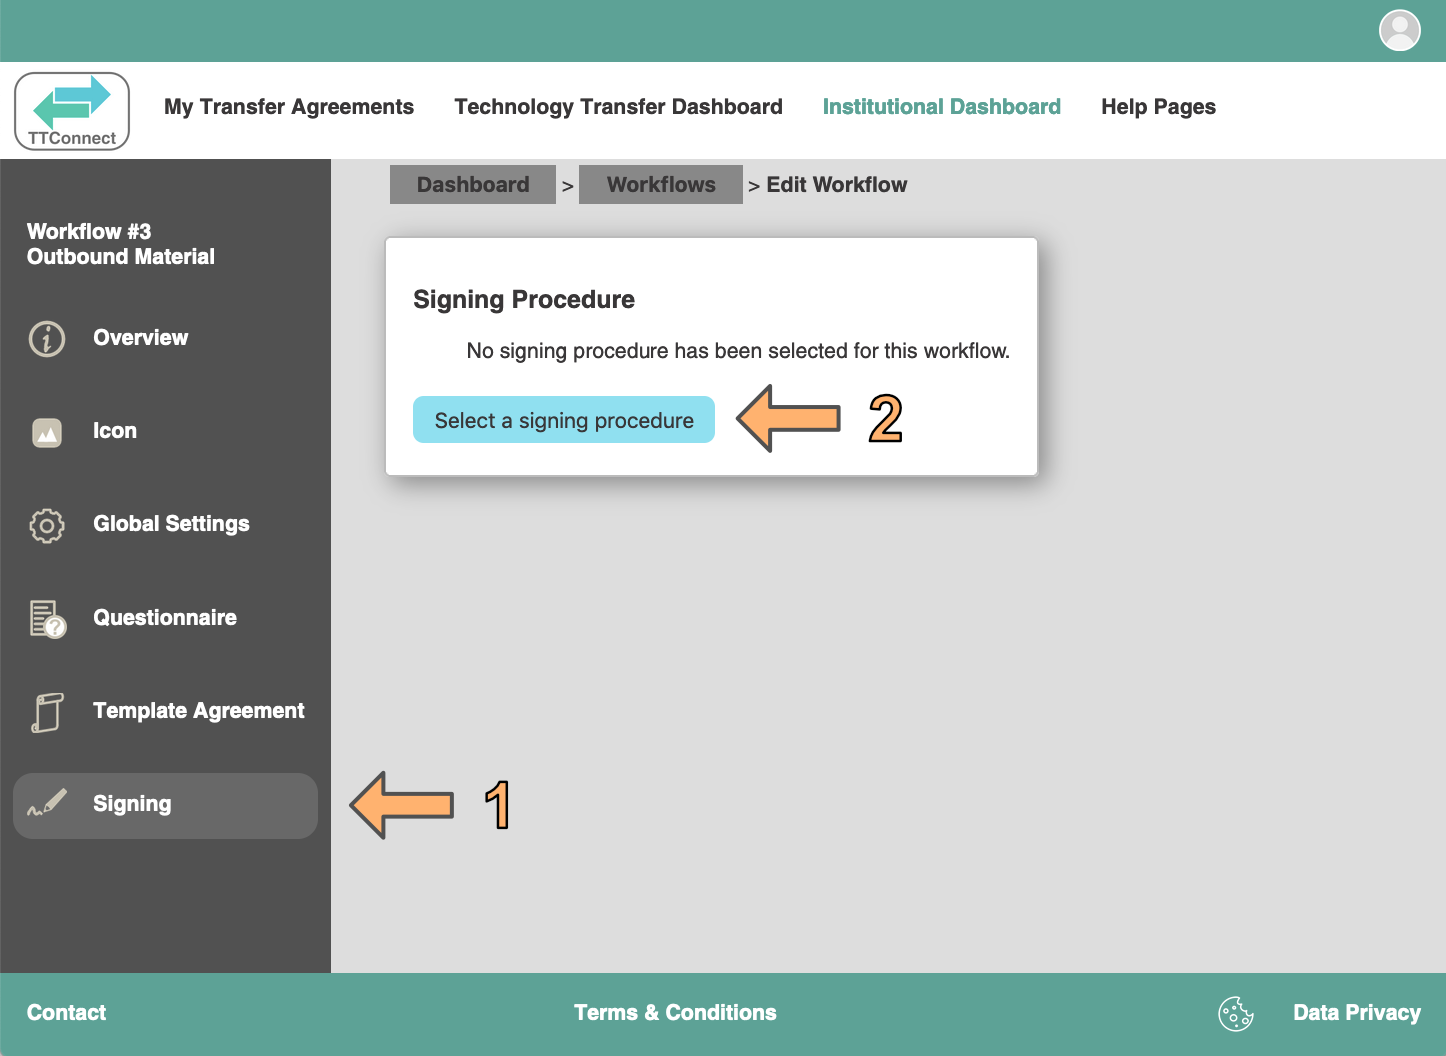
Finally, select a signing procedure. For this, click on "Signing" in the left menu bar (1), then click "select a signing procedure"
(2).
-
Multiple options related to signing can be set on this page. All the options you set here will be used as defaults for all transfer
agreements generated using this workflow. Nonetheless, people from your Technology Transfer office handling the
individual transfer agreements will be able to change these settings on a case-by-case basis. The only exception is if you
turned off the global setting "Technology Transfer needs to review this Material/Data transfer" in step 5 above, in which
case your Technology Transfer office will not need to handle these agreements, and will not receive notifications when new
transfer agreements are generated using this workflow.
1. The "Provider signature required" toggle only appears if this is an outbound transfer agreement. By default, it is on. If you turn it off, then no signature from your institution will be needed to fully execute the agreement. This is particulary useful in combination with turning off the global setting "Technology Transfer needs to review this Material/Data transfer" (see step 5 above). If you turn both off, then the generation and signing of the agreement will be fully automated, and sent to the recipient for signing without any signature from your (provider) side. The agreement text will specify that no provider signature is needed for the agreement to be fully executed.
2. You can select here whether one of the three signatures on the recipient side must be the recipient PI. By default, this is off. If you turn it on, the recipient Technology Office will only be able to adjust whether the recipient PI is fully signing, or simply signing as having "read and acknowledged". This setting is only useful if you use TTConnect or FPSign for signing, in which case the system can force the recipient to sign as you set here. Otherwise, if the recipient is uploading a PDF of a wet-signed agreement, or an agreement signed on another 3rd party website, TTConnect cannot control who signs on the recipient side.
3. "Wet signatures accepted". By default, this is off. If this is turned on, at the signing stage, the recipient will see a message that you will accept a wet signature if necessary, in which case the recipient can print out the agreement on paper, sign it, and mail it to you. If this setting is off, the recipient will be told to sign electronically.
4. You can select a signing modality here, which will be used as default when new transfer agreements are created. In cases where Technology Transfer is handling the agreement, this can also be changed later. In cases where the global setting "Technology Transfer needs to review this Material/Data transfer" is turned off (step 5 above) this will be the signing method that the recipient will be forced to use.

-
Further below, you can enter some signing instructions which will be displayed to the recipient Technology Transfer office
when they are setting up who will sign on their side, and how.
Finally, you can enter the names and email addresses of 3 people from your side who should sign these agreements by default. Again, in cases where your Technology Tranfer office is handling the agreement, this can be changed for individual transfer agreements on a case-by-case basis. If you want to person to only sign as having "read and acknowledged", then click the "Read & Acknowledge Only" checkbox under the name.
Click on "Submit" to complete the Signing section of the workflow.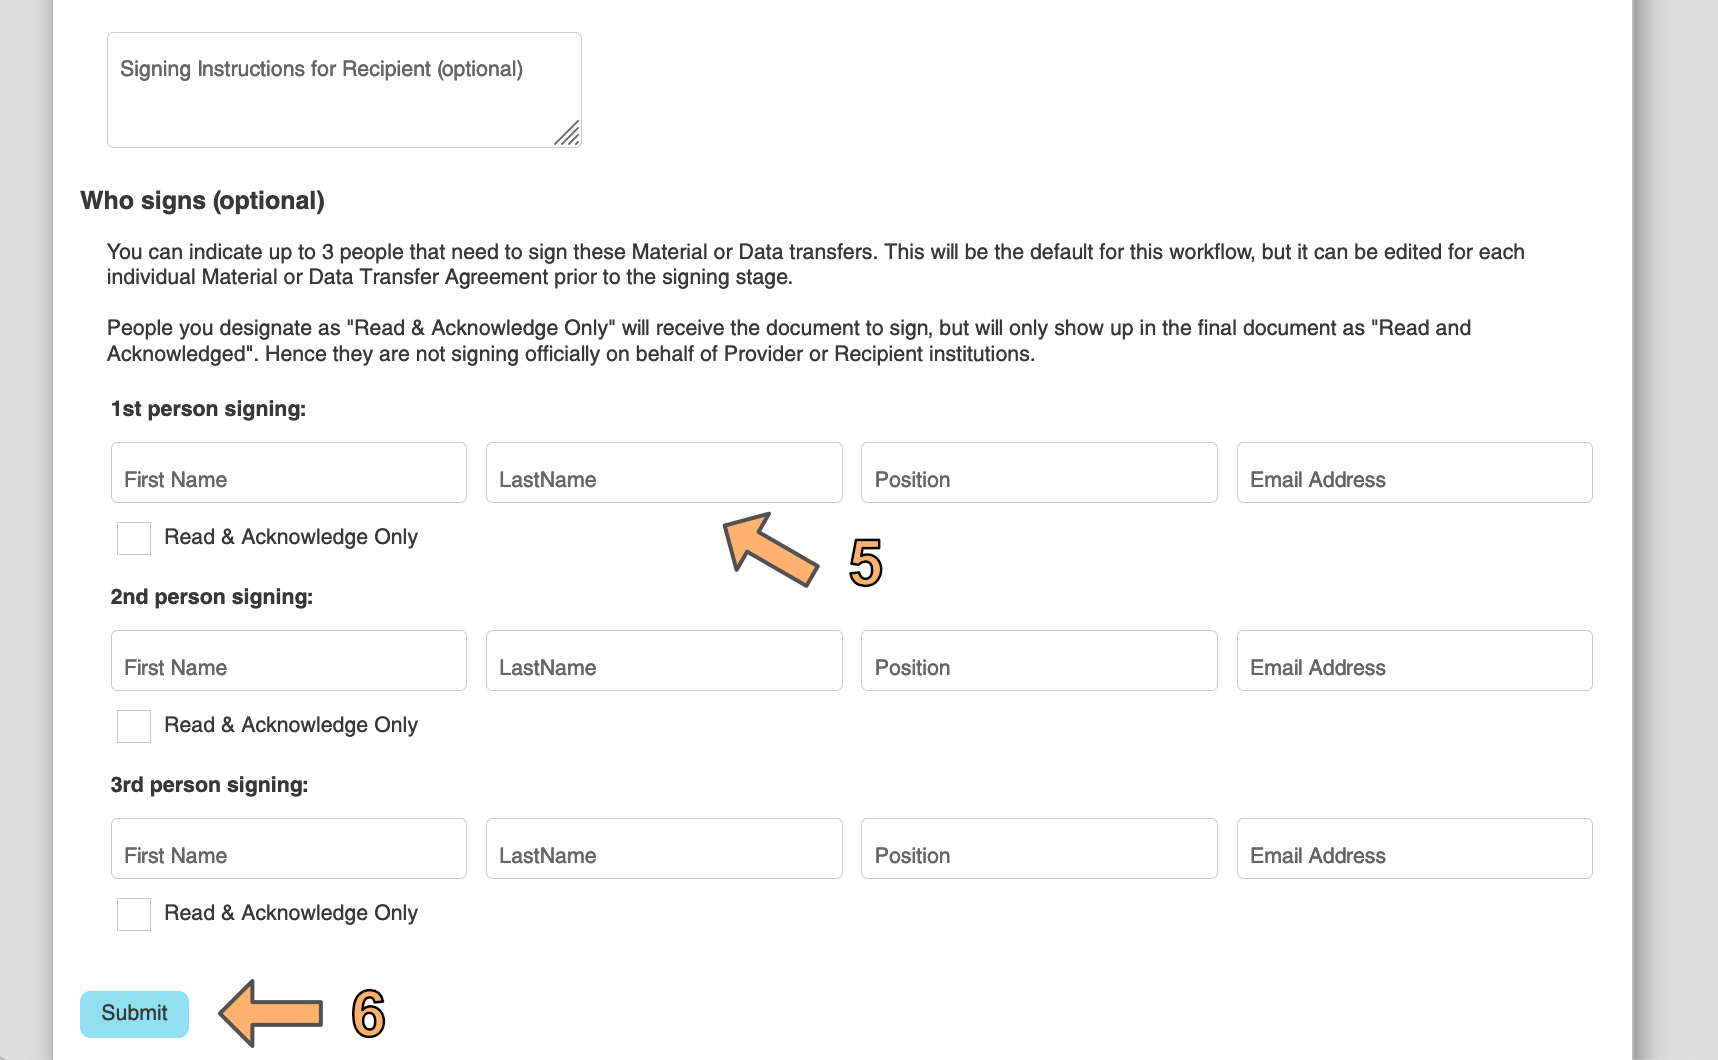
-
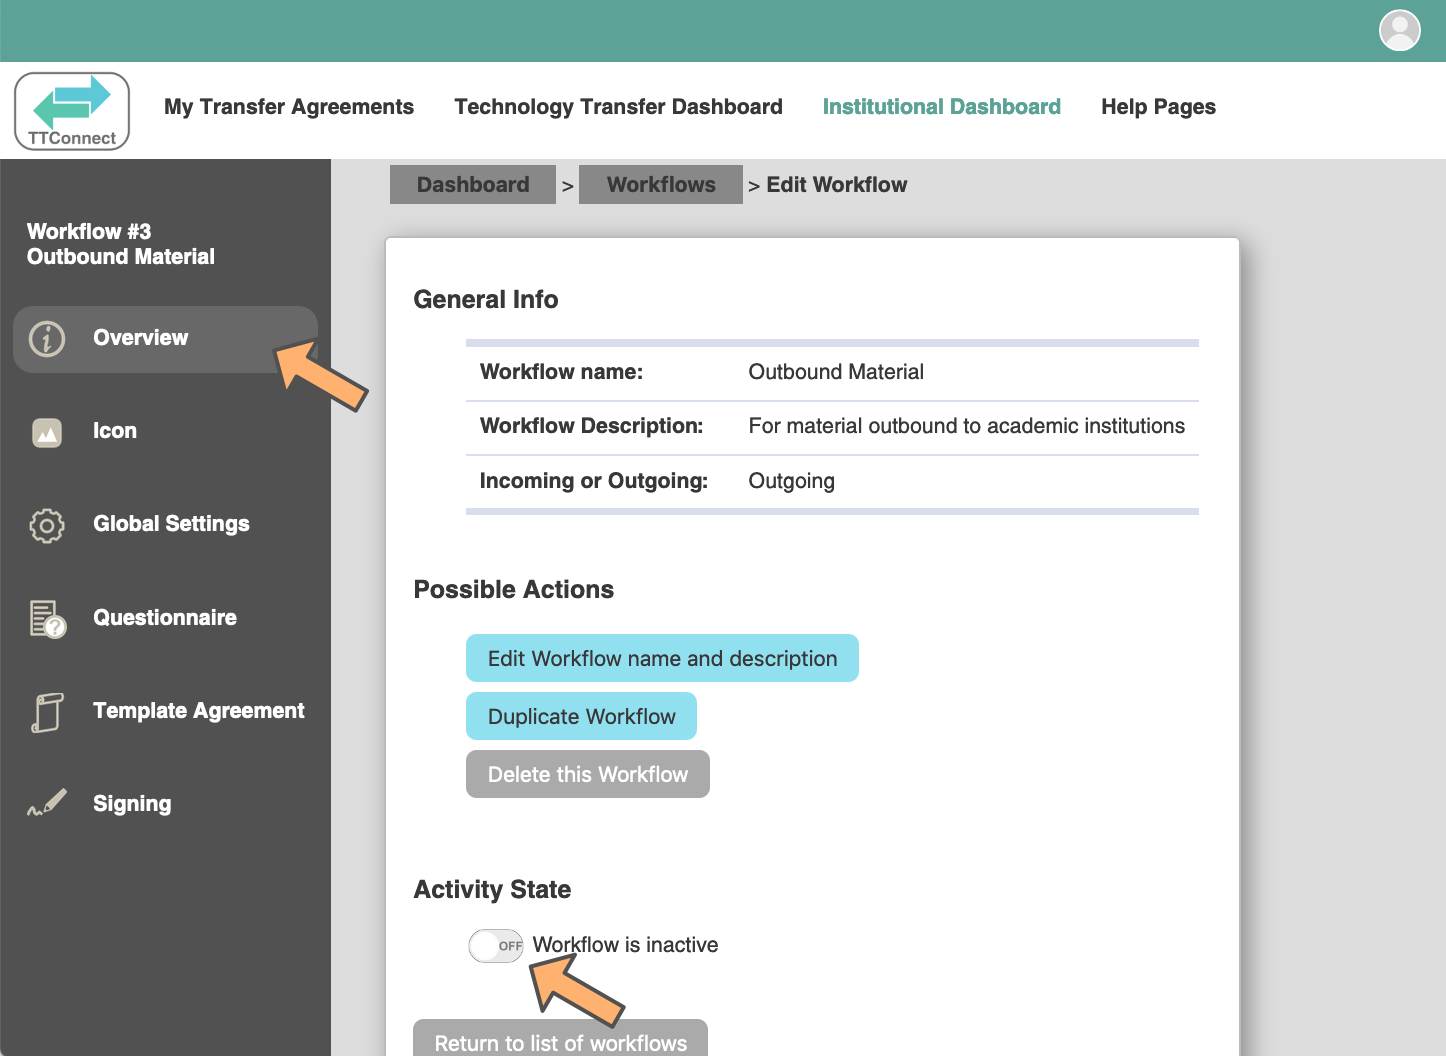
To activate the workflow, click on the "Overview" tab on the left, and then on the corresponding toggle under "activity state".
Until the workflow is active, the scientists from your institution will not see the workflow or be able to start any transfers
using this workflow. This allows you to edit the workflow until you are happy with it and activate it.

Processing...